Tests with Turmeric
“How lovely yellow is! It stands for the sun.” ~ Vincent Van Gogh
I consider myself to be a health-forward person. I watch my carb, sugar and fat intakes religiously.
But, I have a confession: I am not the biggest fan of turmeric. I cook with it, but rarely. Then, I forget that I even have it in my spice cabinet because it gets pushed to the back with disuse. This leads to buying more when a recipe calls for it because I think that I’m out of turmeric.
Turmeric can make the most beautiful, vibrant dyes and inks! But, beware: it is not colorfast and will fade significantly over time.
I am still very new to this process and wanted to do some research on the best practices for modifying color. Honestly, it feels a little like alchemy!
I decided that I would test this with all of the extra turmeric I have lying around. It makes a bold, bright color and I have way more than I will use in a lifetime!
COLOR MODIFIER OR MORDANT?
In my research, I have seen both of these terms used. I have also seen them used interchangeably. But, there has to be a difference,. right? Well, there is!
A color modifier adjusts the color of the dye through a chemical reaction. This is usually done by adjusting the pH of the dye. Some common color modifiers are vinegar, soda ash, baking soda, citric salt and ammonia.
Mordant means “to bite” in French. A mordant binds onto the fibers being dyed to make the color attach more effectively. Many natural dyes do not attach themselves to fiber without some help. Mordants are made out of heavy metals: copper, aluminum and iron. These may or may not be needed. Tannins are an example of a non-metallic mordant. A dye bath made with something that contains a lot of tannins will not necessarily need a mordant.
Color modifiers can be mordants. Mordants can, and usually are modifiers, too! For example: copper will typically add a greenish tint to the color. Iron will ‘sadden’ the color and make it more black or gray. I’ll get into how iron does this later!
A FEW NOTES:
My previous tests: acorn caps and avocado pits/peels didn’t require significant straining. But, the turmeric I used was in powder form. Yes, you can use the root itself, but I didn’t have copious amounts of that available in my kitchen.
For the my turmeric experiments, I strained the results using a mesh strainer twice. Then, I strained it a third time using a mesh funnel.
Even with this, I still have some sediment at the bottom of each jar.
SUPPLIES NEEDED:
You will need to have an extra set of utensils that you will no longer use for cooking food or food consumption when making dye. This recipe for avocado dye uses nontoxic household ingredients but it’s still best practice to have two sets of supplies: for cooking and for ‘other’.
I recommend collecting the following:
12 qt pot with lid
measuring cups
measuring spoons
mesh strainer
mesh funnel
various glass jars to store dye liquid
pH strips.
stainless steel tongs
large spoon
paper and fabric strips for testing
It’s best to use supplies made out of environmentally neutral materials like stainless steel and glass for the best control over the results.
For pH strips, I recommend these.

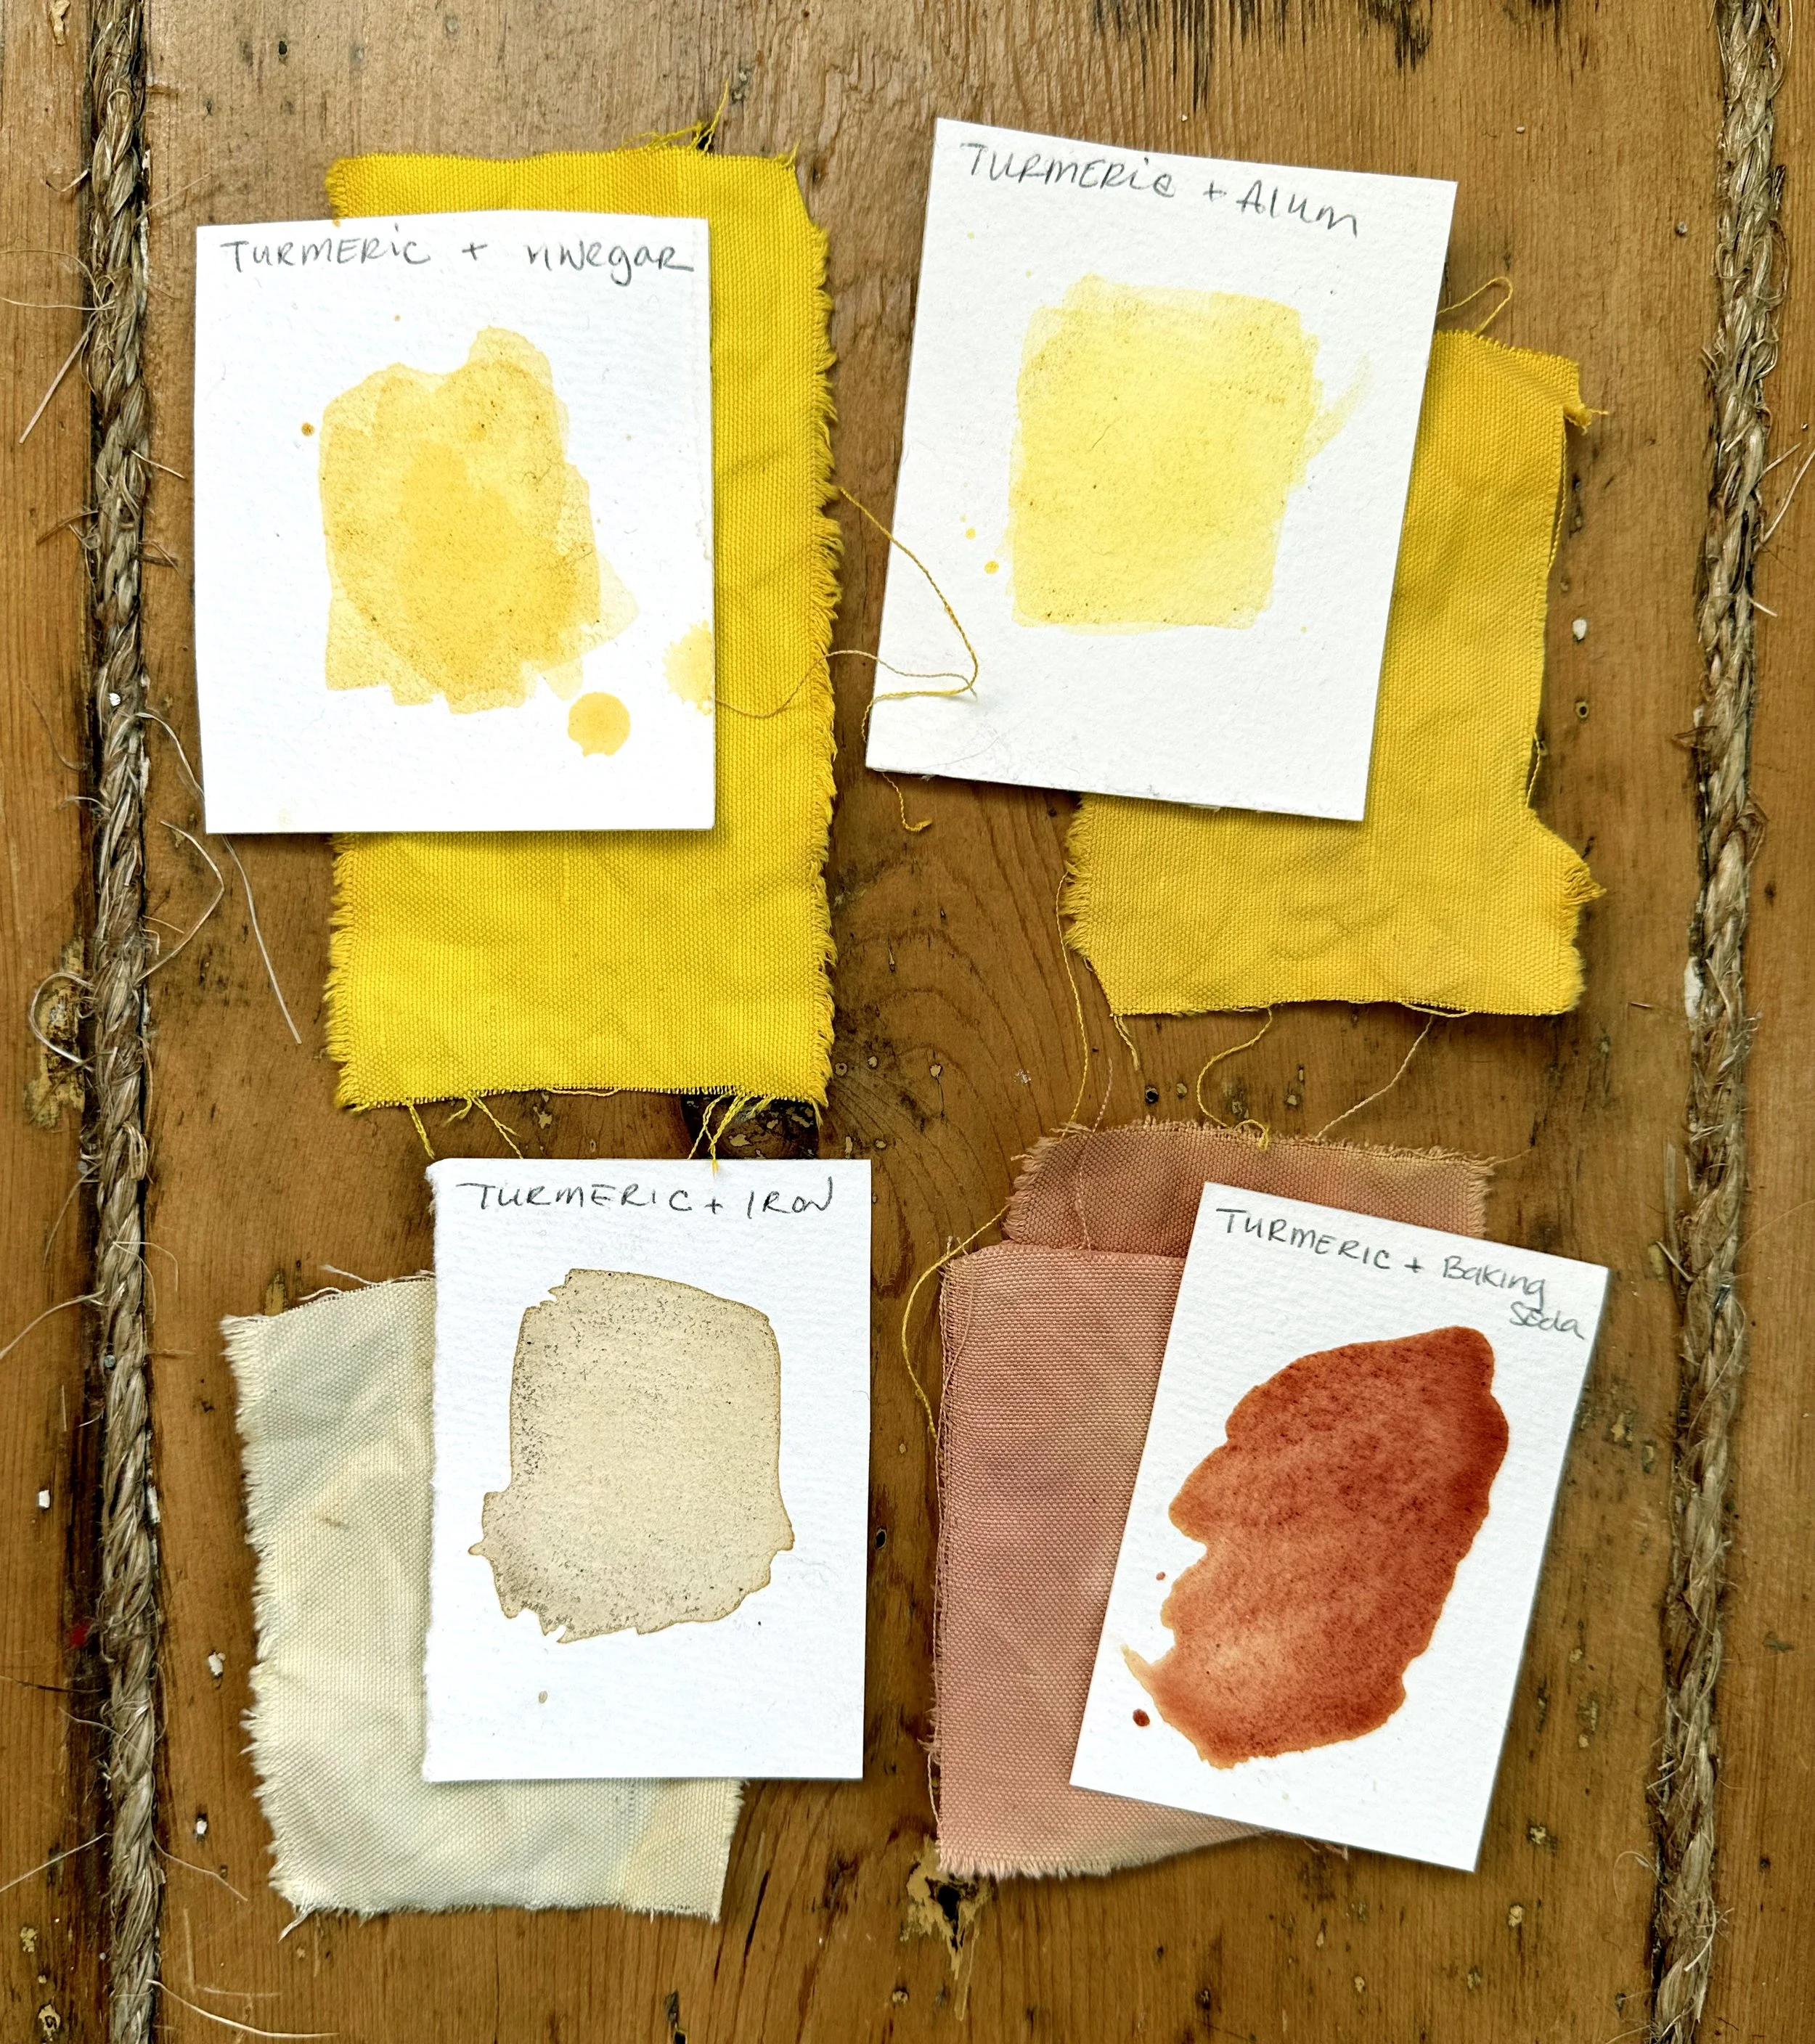
My first experiment mixed turmeric with baking soda. The finished color was quite a surprise! I didn’t expect it to turn into this beautiful coral-orange color. I am very happy with this result and cannot wait to use it as a watercolor/ink for my film: Sundays (2023).
MATERIALS NEEDED:
7 tsp of turmeric
2 quarts of water
5 tsp of baking soda
wintergreen oil, clove oil or whole cloves
gum arabic (if this will be used as an ink or watercolor)

This was my favorite result - I love this bright summery color. Maybe I’m just ready for summer. Vinegar can bring out a shocking brightness in a dye’s color.
It wont’ be very colorfast without a mordant. Remember: vinegar is a color modifier only! Even so, the dye latched itself to the fabric immediately. The color was the same saturation 15 minutes soaking in the dye bath, 1 hr soaking in the dye bath, and 5 hours soaking in the dye bath!
MATERIALS NEEDED:
7 tsp of turmeric
2 quarts of water
1/2 c. of vinegar
wintergreen oil, clove oil or whole cloves
gum arabic (if this will be used as an ink or watercolor)
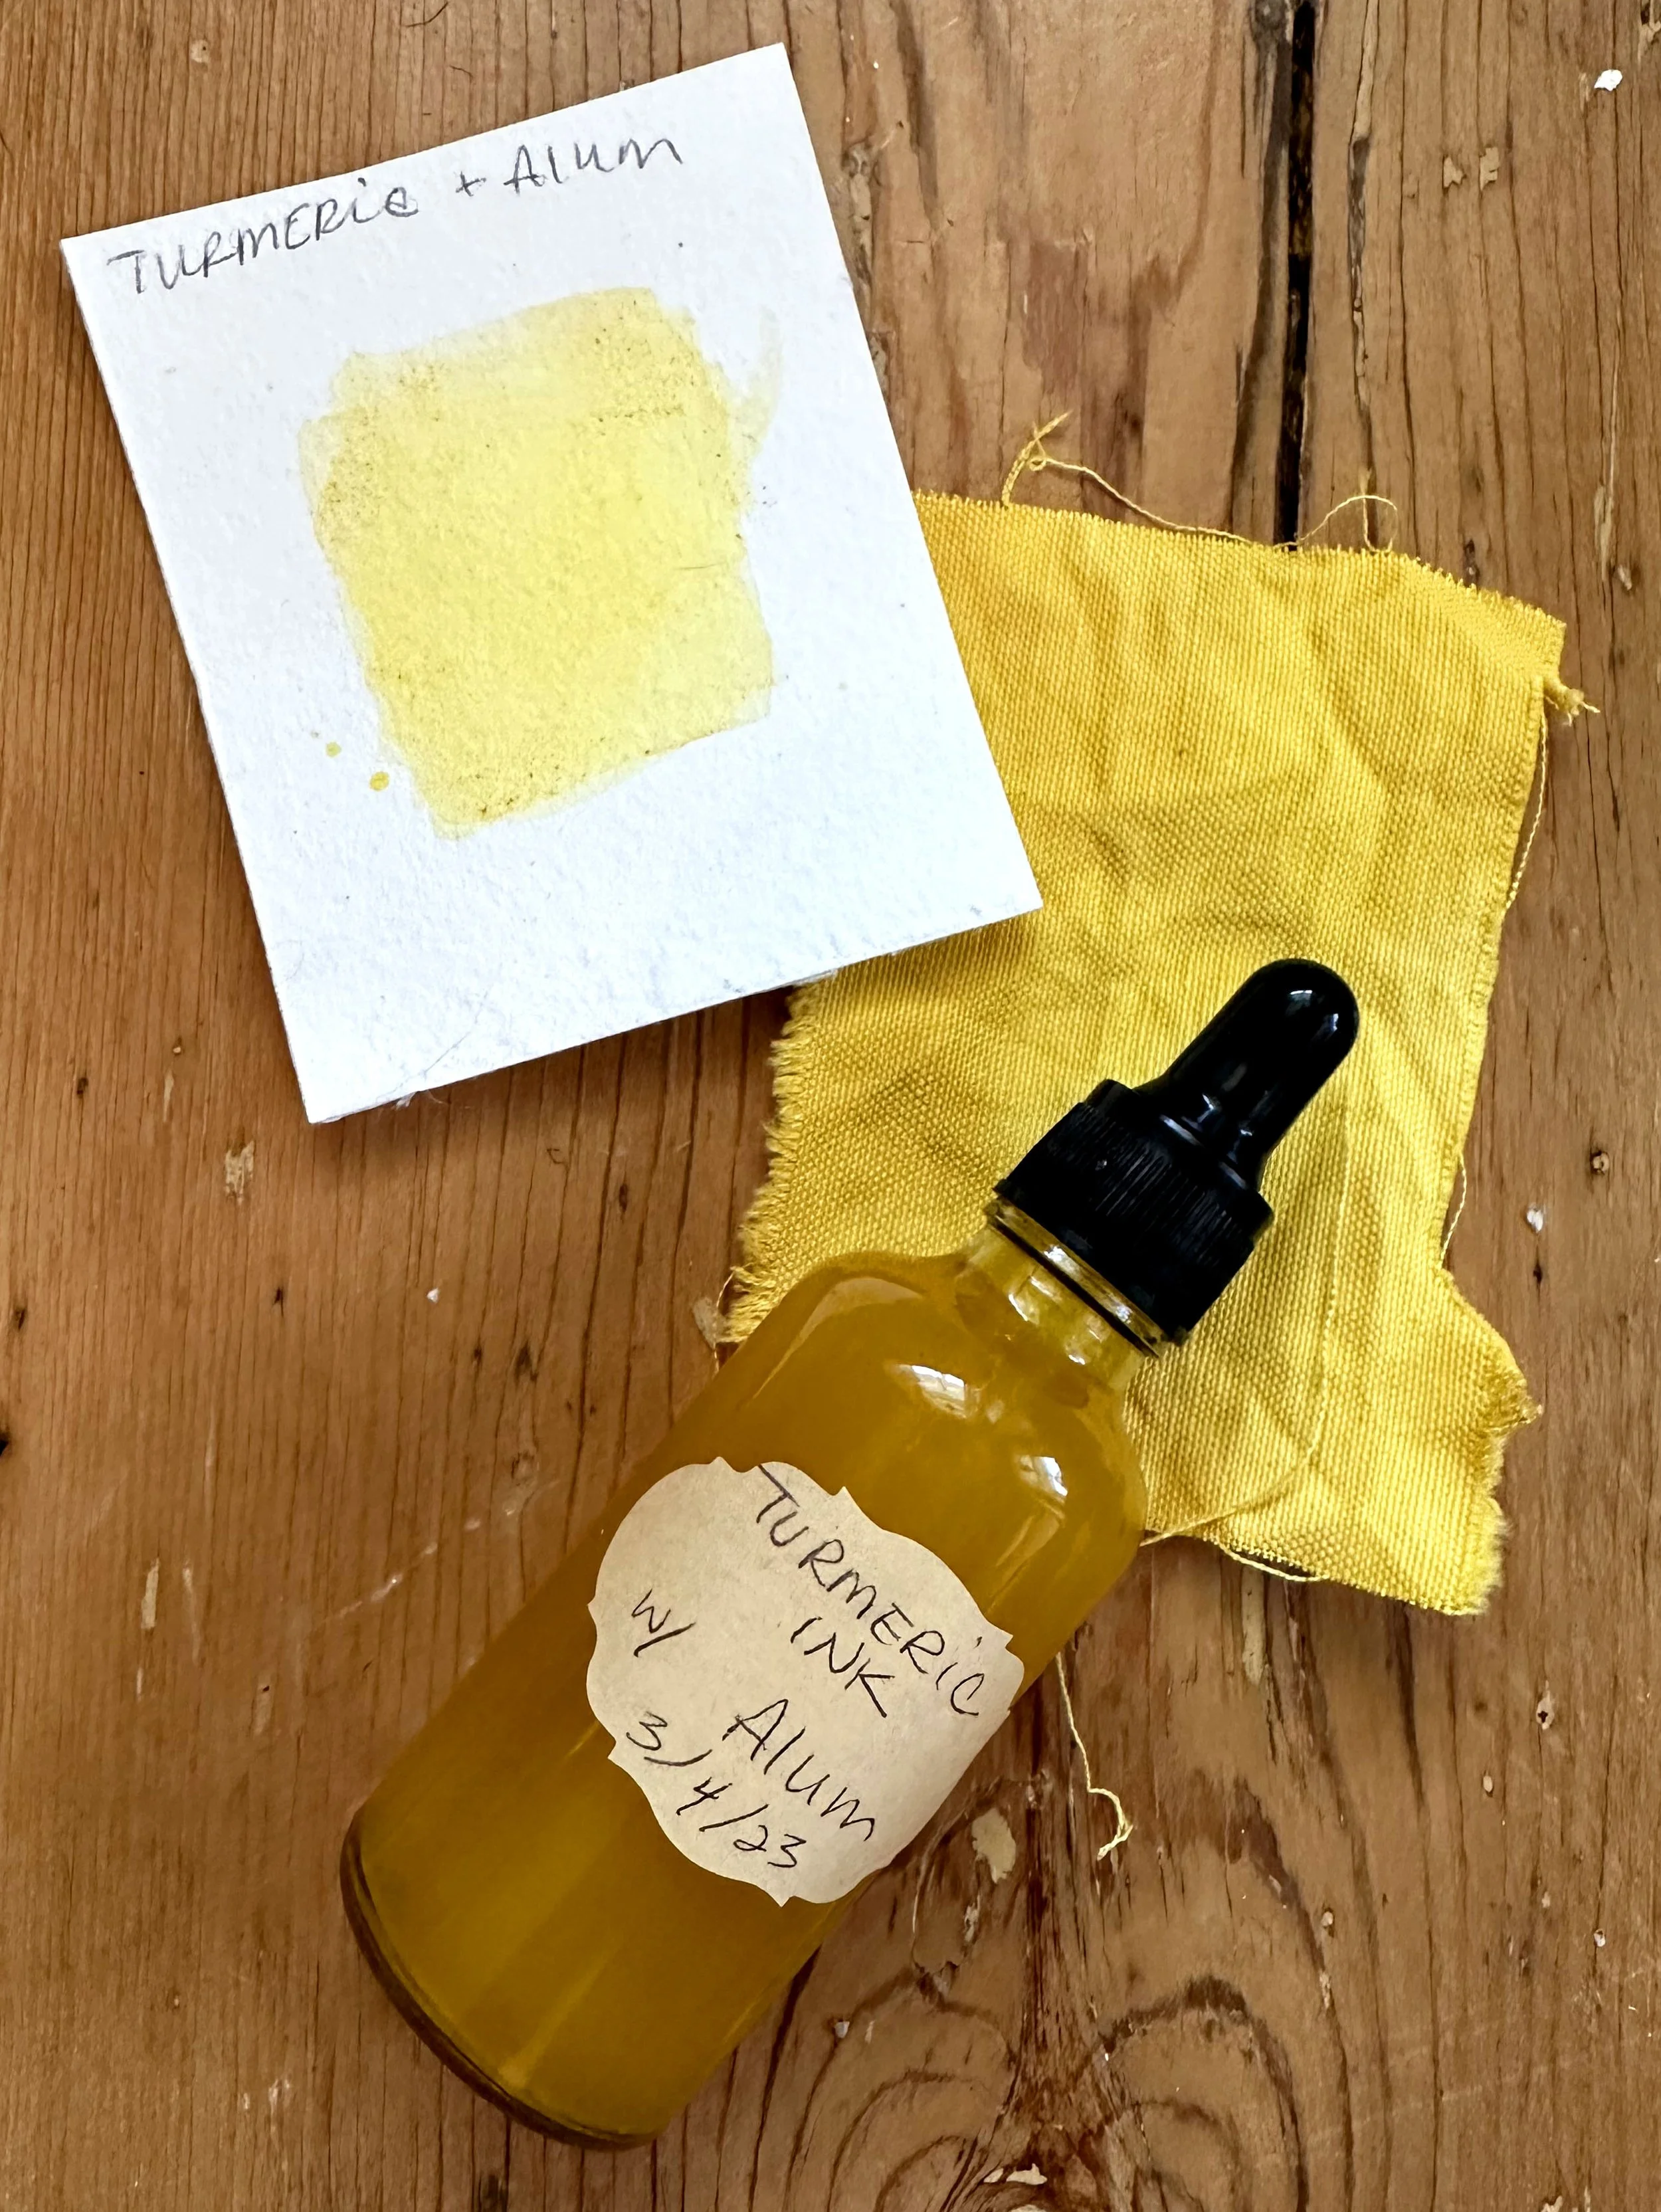
The differences between the alum and vinegar-based turmeric experiment are pretty negligible. There is a slight difference to the yellow color. It seems that alum doesn’t bring out the brightness of the yellow quite like the vinegar does.
In the future, if I want to use this for fabrics, I will try to make a dye bath that mixes the amount of alum used with the amount of vinegar used. This will hopefully give me the brightness of the vinegar-based turmeric experiment but with the ability to bind itself to the fiber I’m dying.
A note on alum: it is one of the safest of the metal mordants. But, it can still cause nose and throat irritation when breathing it in. Make sure to experiment with alum in a well ventilated space or, even better, outside.
MATERIALS NEEDED:
7 tsp of turmeric
2 quarts of water
2 tsp powdered alum
wintergreen oil, clove oil or whole cloves
gum arabic (if this will be used as an ink or watercolor)

While I enjoy the color that this became, I am a little underwhelmed by it. I think that, if I do this again, I will add a bit less iron than I did to see if I can get a warmer brown, or even a greenish yellow.
But, the result is definitely useful for my film just in a different way then how I imagined!
IRON….SADDENS?
I find it sort of… cute that iron ‘saddens’ color. Or, basically, it darkens the color. It does this by interacting with the natural tannins in dye material and blackens them. The more iron you use, the darker it can get.
A note on using iron: it can be fairly toxic. I recommend making this dye outdoors.
MATERIALS NEEDED:
7 tsp of turmeric
2 quarts of water
5 iron sulfate pills to start, more if needed
wintergreen oil, clove oil or whole cloves
gum arabic (if this will be used as an ink or watercolor)
PROCESS:
add turmeric to 1/2 cup of warm water and stir to dissolve.
add the turmeric to the pot of water.
Add the color modifier / mordant of your choice: vinegar, alum, iron or baking soda.
simmer for 1 hr.
once the desired color is reached, take off heat.
Strain the turmeric from the dye/ink using the mesh strainer twice and then the mesh funnel.
add gum arabic if this will be used as an ink or watercolor. I recommend 2-3 drops per bottle, but it’s up to you!
the dye/watercolor/ink is ready for use! Use it now, or store it for later!
REMINDER: if you choose to store it for later, make sure to sterilize your containers and add 1 drop of wintergreen oil or clove oil per oz. Or, you can add 1-2 whole cloves per oz to reduce mold growth.
Overall, I am very happy with all of these tests… and can’t wait to make more experiments to use in my film: Sundays (2023).